Android Mobile SDKs
Integrate Pine Labs payments into your mobile application using our Android Native SDK.
Integration Steps
Learn how you can integrate with Pine Labs Native SDKs across all platforms. The SDK provides a secure hosted checkout experience using backend APIs and client-side SDKs for seamless payment processing.
- Prerequisites
- Integrate APIs in Your Backend
- SDK Installation and Initialization
- Handle Payment Callbacks
- Manage Transactions
❗️ Security Best Practices:
- Ensure you store your
client_idandclient_secretin your Backend securely.- Integrate our APIs on your backend system.
- We strictly recommend not to call our APIs from the frontend.
- Failure to adhere to the above guidelines may result in legal implications. In such cases, you will be held responsible for any damage or loss arising from non-compliance.
1. Prerequisites
Requirements:
- Android SDK version 26 (Oreo) or higher
- Android Studio 4.0 or higher
- Internet permissions configured in AndroidManifest.xml
2. Integrate APIs in Your Backend
Start a payment by triggering the payment flow. To start a payment follow the below steps:
2.1. Generate Auth Token
Integrate our Generate Token API in your backend servers to generate the auth token. Use the token generated to authenticate Pine Labs Online APIs.
Below are the sample requests and response for the Generate Token API.
curl --location 'https://pluraluat.v2.pinepg.in/api/auth/v1/token' \
--header 'accept: application/json' \
--header 'content-type: application/json' \
--header 'Request-Timestamp: 2024-07-09T07:57:08.022Z' \
--header 'Request-ID: c17ce30f-f88e-4f81-ada1-c3b4909ed235' \
--data '
{
  "client_id": "a17ce30e-f88e-4f81-ada1-c3b4909ed232",
  "client_secret": "fgwei7egyhuggwp39w8rh",
  "grant_type": "client_credentials"
}
'
Refer to our Generate Token API documentation to learn more.
2.2. Generate Checkout Link
Use this API to Generate a checkout link, for authentication use the generated access token in the headers of the API request.
Below are the sample requests and response for a Generate Checkout Link API.
curl --request POST \
     --url https://pluraluat.v2.pinepg.in/api/checkout/v1/orders \
     --header 'accept: application/json' \
     --header 'content-type: application/json' \
     --data '
{
  "merchant_order_reference": "112345",
  "order_amount": {
    "value": 1100,
    "currency": "INR"
  },
  "integration_mode": "SDK",
  "pre_auth": false,
  "allowed_payment_methods": [
    "CARD",
    "UPI",
    "NETBANKING",
    "POINTS",
    "WALLET"
  ],
  "notes": "order1",
  "callback_url": "https://sample-callback-url",
  "failure_callback_url": "https://sample-failure-callback-url",
  "purchase_details": {
    "customer": {
      "email_id": "kevin.bob@example.com",
      "first_name": "Kevin",
      "last_name": "Bob",
      "customer_id": "123456",
      "mobile_number": "9876543210",
			"country_code": "91",
      "billing_address": {
        "address1": "10 Downing Street Westminster London",
        "address2": "Oxford Street Westminster London",
        "address3": "Baker Street Westminster London",
        "pincode": "51524036",
        "city": "Westminster",
        "state": "Westminster",
        "country": "London",
        "full_name": "harsh kumar",
        "address_type": "HOME/WORK/OTHER",
        "address_category": "BILLING"
      },
      "shipping_address": {
        "address1": "10 Downing Street Westminster London",
        "address2": "Oxford Street Westminster London",
        "address3": "Baker Street Westminster London",
        "pincode": "51524036",
        "city": "Westminster",
        "state": "Westminster",
        "country": "London",
        "full_name": "harsh kumar",
        "address_type": "HOME/WORK/OTHER",
        "address_category": "BILLING"
      }
    },
    "merchant_metadata": {
      "express_checkout_enabled": "TRUE",
      "express_checkout_allowed_action": "checkoutCollectAddress",
      "key1": "DD",
      "key2": "XOF"
    }
  },
  "cart_details": {
    "cart_items": [
      {
        "item_id": "cart_id_1",
        "item_name": "T Shirt",
        "item_description": "Test Description",
        "item_details_url": "https://chriscross.in/cdn/shop/files/95_800x.jpg",
        "item_image_url": "https://chriscross.in/cdn/shop/files/95_800x.jpg",
        "item_original_unit_price": 1,
        "item_discounted_unit_price": 1,
        "item_quantity": 1,
        "item_currency": "INR"
      }
    ]
  }
}
'
Refer to our Generate Checkout Link documentation to learn more.
3. SDK Installation & Initialization
3.1. Installation
Follow the steps below to add the Infinity SDK to your Android application and initialize it using the token from the Order Creation API.
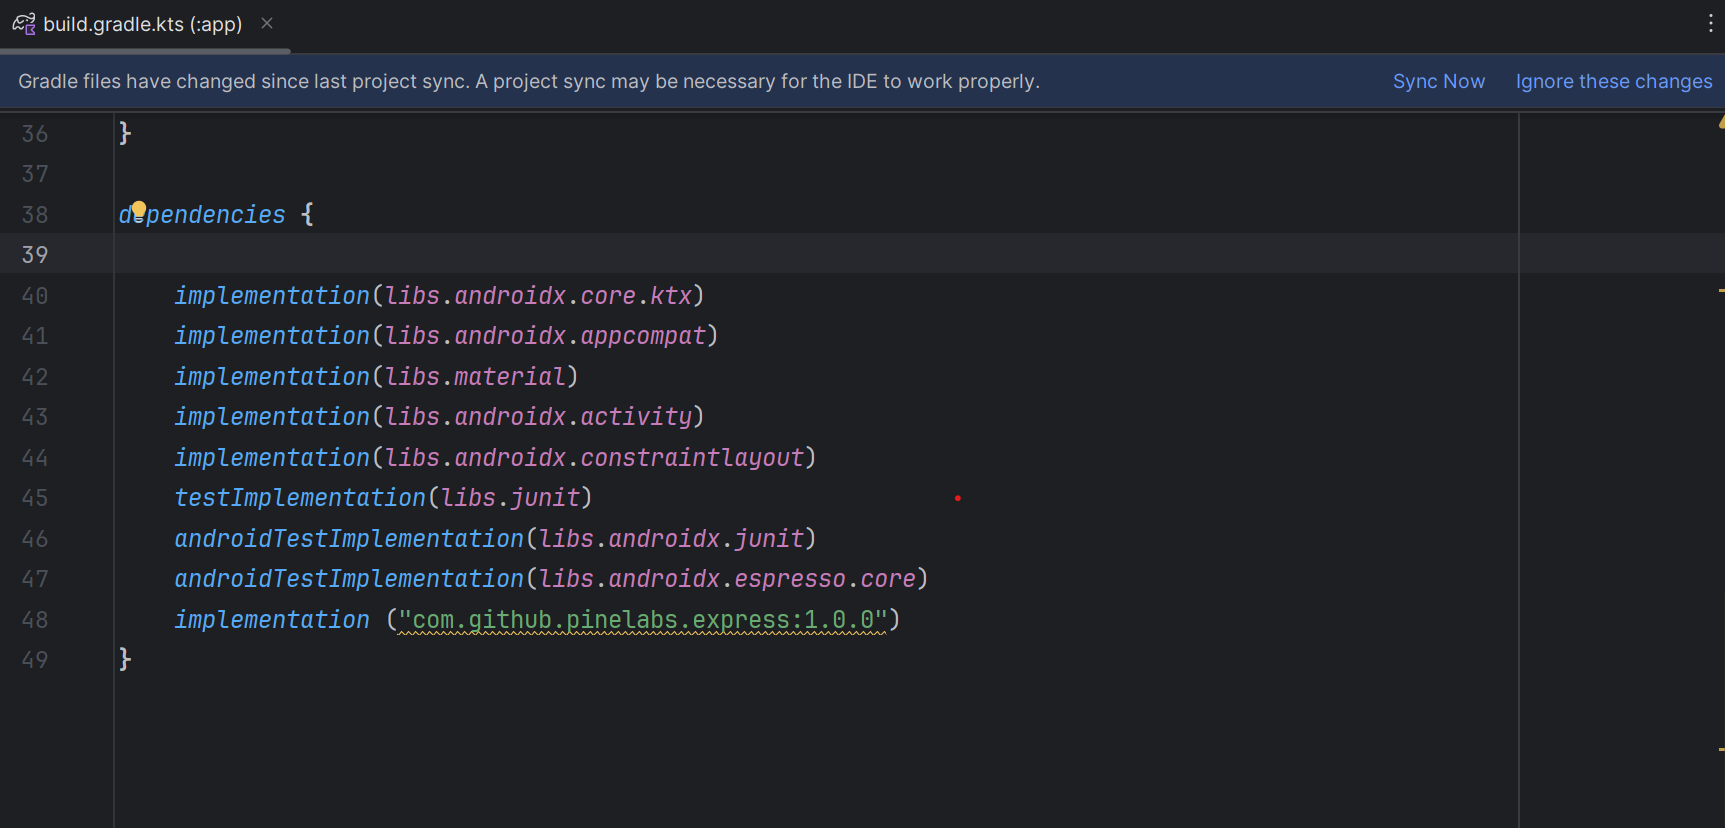
Step 1: Add the SDK Dependency
Add the dependency to your app-level build.gradle file.
  dependencies {
      implementation("com.github.plural-pinelabs:Pinelabs-Android-SDK:1.10.0")
  }
Alternatively, you can declare it through catalog styling using libs.versions.toml.
Step 2: Sync Your Project
Sync your project with Gradle to download the SDK and make it available in your build.
3.2. Initialization
To initialise the android web SDK, follow the below steps:
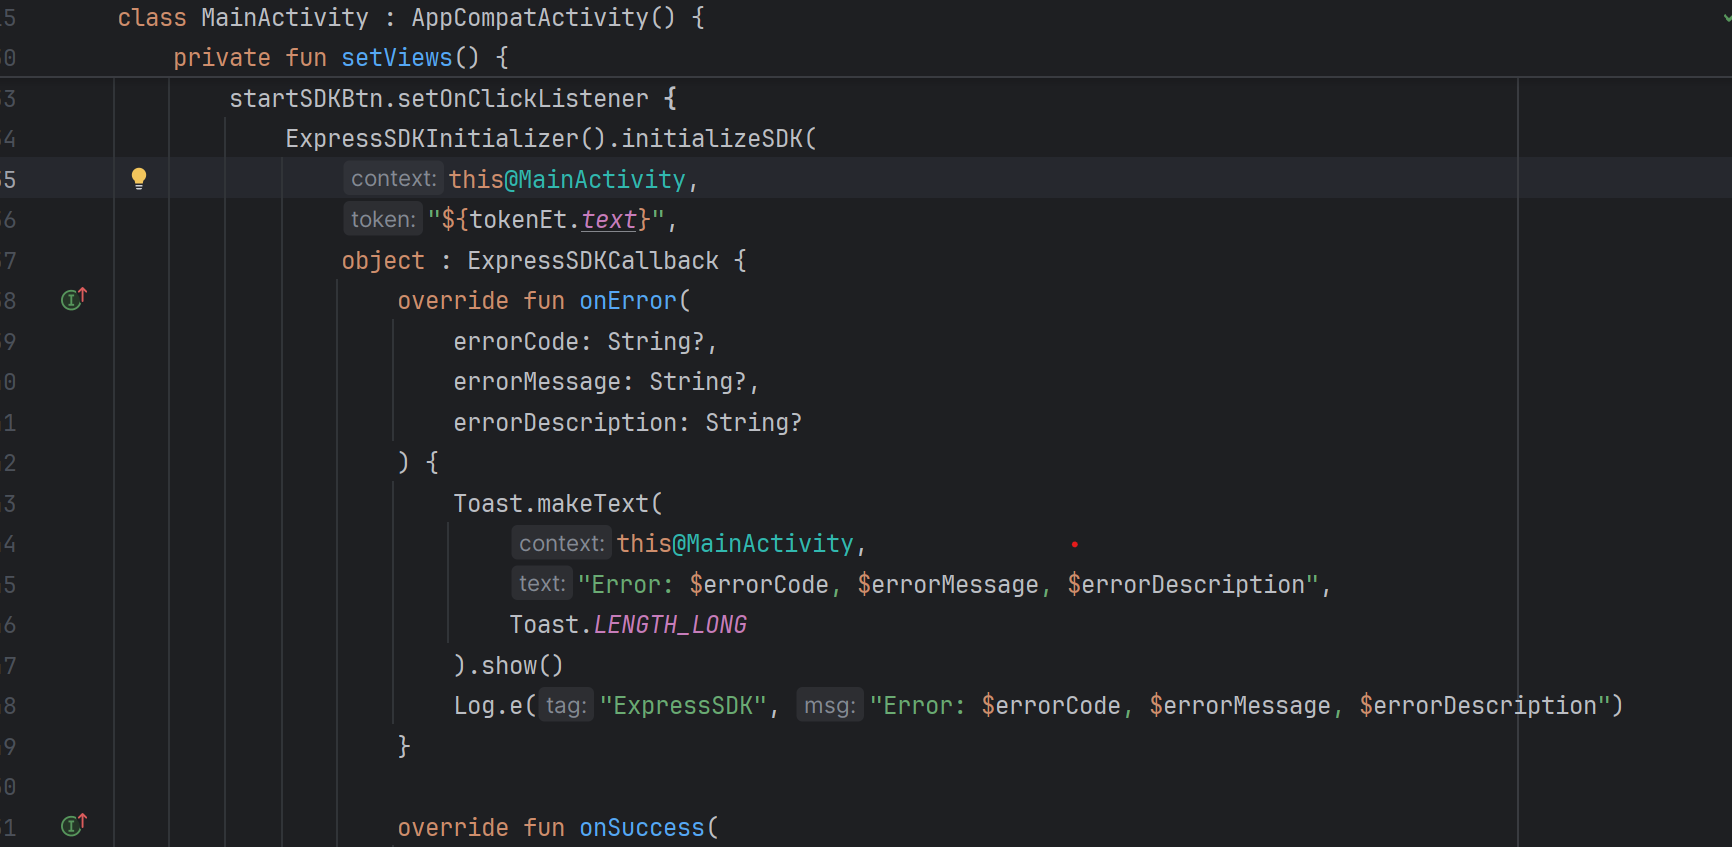
Step 1: Initialize and Launch the SDK
Use the method below to start the SDK and pass the token received from the Create Order API.
ExpressSDKInitializer().initializeSDK(
    this@MainActivity,
    "${tokenEt.text}", // Replace with the actual Redirect token
    object : ExpressSDKCallback {

        override fun onError(
            errorCode: String?,
            errorMessage: String?,
            errorDescription: String?
        ) {
            Toast.makeText(
                this@MainActivity,
                "Error: $errorCode, $errorMessage, $errorDescription",
                Toast.LENGTH_LONG
            ).show()
            Log.e("ExpressSDK", "Error: $errorCode, $errorMessage, $errorDescription")
        }

        override fun onSuccess(
            responseCode: String?,
            responseMessage: String?,
            responseDescription: String?
        ) {
            Toast.makeText(
                this@MainActivity,
                "Success: $responseCode, $responseMessage, $responseDescription",
                Toast.LENGTH_LONG
            ).show()
            Log.i("ExpressSDK", "Success: $responseCode, $responseMessage, $responseDescription")
        }

        override fun onCancel(
            responseCode: String?,
            responseMessage: String?,
            responseDescription: String?
        ) {
            Toast.makeText(
                this@MainActivity,
                "Cancelled: $responseCode, $responseMessage, $responseDescription",
                Toast.LENGTH_LONG
            ).show()
            Log.d("ExpressSDK", "Cancelled: $responseCode, $responseMessage, $responseDescription")
        }
    },
    true // Set to false for PROD, true for UAT
)
Step 2: Configure the Environment
Configure the runInSandBox flag based on the environment:
- UAT (Testing):
Set runInSandBox = true - Production (Live):
Set runInSandBox = false
Note: Always validate the full flow in UAT before switching to Production.
4. Handle Payment Callbacks
You need to implement call-back methods to handle your payment responses. This will provide the payment status and reason for transaction failures. Based on the reasons for failures, handling can be built at your end. Transaction callbacks can be listened to via overriding methods of EdgeResponseCallback.
Callback Methods
- onSuccess() : Triggered when the transaction is successfully completed
- onError() : Triggered when an error occurs (network, API failures, etc.)
- onCancel() : Triggered when the user cancels the transaction
5. Manage Transactions
Track and verify transaction status using Pine Labs APIs. To retrieve the latest status, use the Fetch APIs or subscribe to webhooks for real-time transaction updates.